
How to Use Snipping Tool Like a Pro: Complete Guide for Windows & Mac
It’s no secret you probably don’t have a clue about Snipping Tool. This desktop screenshot utility can change how you capture, edit, and share screenshots of screen content. Whether you are recording software bugs, video feedback for technical review, or capturing on-screen tutorials, we’ll show you how to record your desktop using Nonabraca, free screen capture software, to instantly increase your productivity.
Almost no one takes the time to learn the ins and outs of their screenshot tool. You’re going to learn some pro tips that take simple screen captures to a higher level. This in-depth Snipping Tool guide is everything you need to know about the Snipping Tool – from the very basics to the things you didn’t even know you could do with the Snipping Tool if you’re tech-savvy.
What Is Snipping Tool & Why It's Still a Game-Changer in 2025
The Snipping Tool started as Microsoft’s answer to the frustrating Print Screen button. Instead of capturing and pasting your entire screen into Paint, this screen clipping software lets you select exactly what you need.
This Windows screenshot tool for Windows has been around as part of Windows XP since 2002, and it’s been there in Windows ever since. Tool went from a clipper to a complete capture suite. Today’s rendition adds annotation tools, delay timers, and several capture modes.
Mac owners enjoy a similar feature by default with the built-in Mac screenshot tool. Apple’s methods are much different than Windows, but they both offer powerful means for taking a screenshot on a PC or a Mac, without the need to download anything.
The tool’s biggest advantage? Speed. And while other contenders need to be downloaded and installed, you can begin using MNVLP straight away to record your screen. Just because the print screen alternative makes one quicker in time, especially during busy weekdays.
How to Use Snipping Tool Like a Pro: Complete Guide for Windows & Mac Users
Windows Snipping Tool Mastery
Getting started with the Snipping Tool for Windows takes seconds. Press Windows key + Shift + S to launch the modern Snip & Sketch interface instantly. This keyboard shortcut for screenshots works across all Windows versions.
Alternative access methods include:
- Type “Snipping Tool” in the Start menu search
- Pin the app to your taskbar for one-click access
- Use Windows key + R, then type “snippingtool”
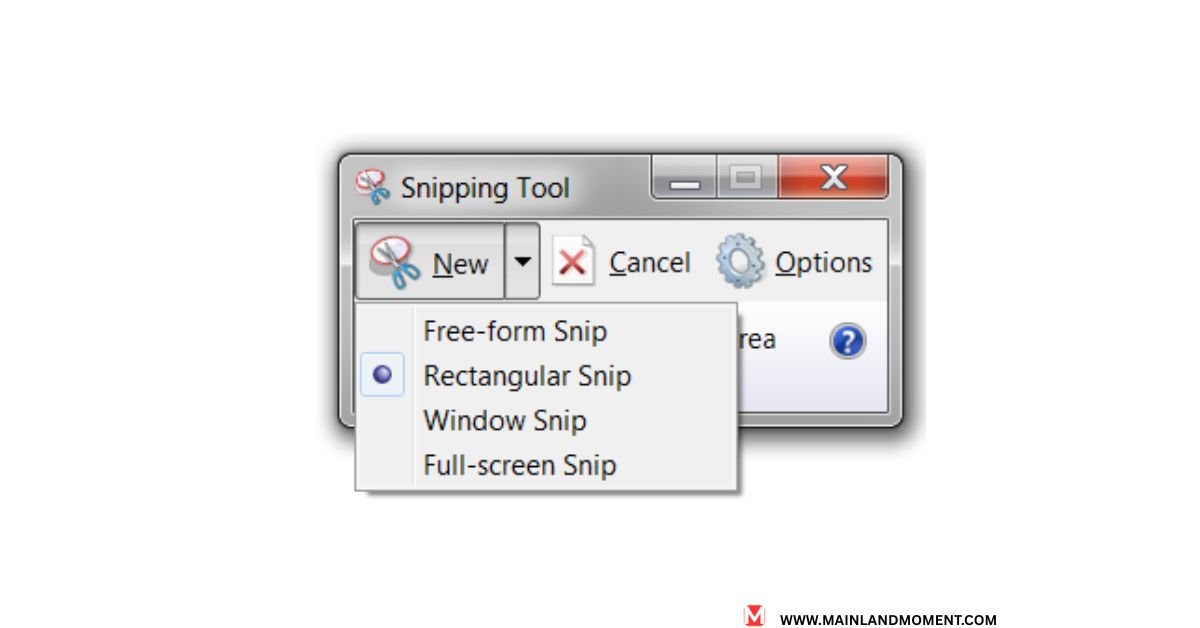
The Windows 11 Snipping Tool offers four distinct screen snip options:

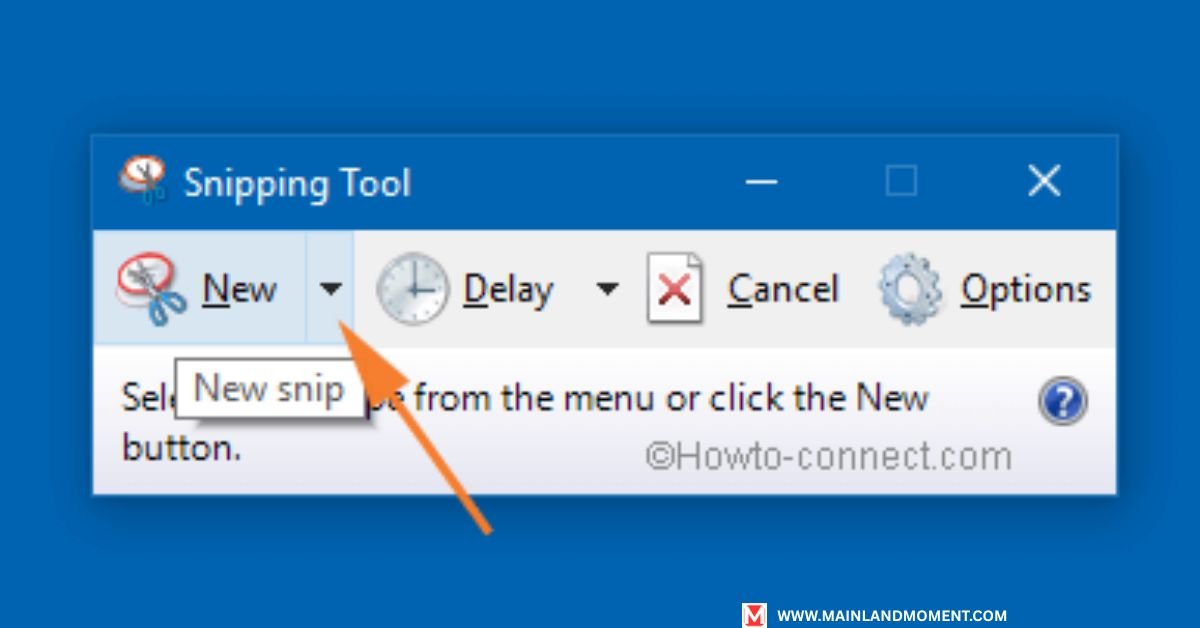
Another aspect of advanced Windows tactics is the delay timer. This feature allows you to record a portion of the screen that contains the drop-down menus or tooltips that are hotkeys to the screen. Set a delay of 3-5 seconds, fire the menu, and then wait for the auto capture.
Mac Screenshot Superpowers
Mac users can take a screenshot on a PC equivalent using these screenshot shortcut keys:
- Command + Shift + 3: Captures your entire screen
- Command + Shift + 4: Creates a crosshair cursor for custom selection
- Command + Shift + 5: Opens the screenshot toolbar with advanced options
READ ALSO: How to Use ChatGPT Effectively
The screenshot toolbar is Apple’s most potent capture interface. You can record flash videos on the screen, timer-delayed screen shots, and screen captures saved to a file. You can also add voice narration to screen recordings with the microphone option.
Advanced Mac tricks: Use option-drag. Another power move on a Mac is holding the Option key while you drag. This makes for perfectly centred selections from where you started. Press Shift after beginning a selection to force proportions to squares and only the aspect ratio.
Snipping Tool vs Alternatives: Which One Wins in 2025
The Snipping Tool compared to other favorites. But, when comparing Snipping Tool against some of the options available, you might be able to take a different approach. Greenshot has more annotation options but comes pre-installed and has better resource utilization. Screenshot by Lightshot offers cloud sharing, but the app raises privacy issues with its automatic uploads.
Snagit the dominator of professional settings, offers advanced editing options. Though it costs $62.99 per license and the Snipping Tool is entirely free. Most users do not need to pay for additional tools because the native tools have just enough functionality to get by with.
Performance test revealed that Snipping Tool starts 40% quicker than those of installed image editing programs. Memory usage remains under 15MB while feature-rich competitors such as Xfce require a minimum of 50- 100 MB. This is important when lots of resources are being used.
For security reasons , corporate organizations would rather stick to native means. The Snipping Tool will not send your screenshots back to external servers, making it particularly useful for sensitive documentation. IT departments like that they don’t have to deal with any additional software licenses or updates.
Hidden Features of Snipping Tool You Should Know in 2025
The delay function transforms how you capture the screen using Snipping Tool. Access this through the timer dropdown in the modern interface. Choose 3, 5, or 10-second delays to photograph temporary interface elements like hover states or dropdown menus.
Annotation capabilities go beyond basic highlighting. The pen tool offers multiple colors and thickness options. Use the highlighter for emphasis without obscuring text. The eraser tool provides pixel-perfect corrections for professional results.
Integration mysteries include direct sharing to email applications. After capturing with the Snipping Tool, click the share button to attach screenshots to Outlook messages instantly. OneNote integration lets you save screen captures directly into notebooks with automatic organization.
Mac’s hidden arsenal includes pointer customization. Enable “Show mouse pointer in screenshots” through the Screenshot app preferences. This helps create clearer tutorials by showing exactly where users should click.
Window shadow control on Mac creates professional-looking captures. Disable shadows in Screenshot preferences for clean, minimal designs. Enable them for realistic window presentations that show depth and context.
Best Snipping Tool Tips & Tricks for Fast Screenshots
Productivity optimization starts with custom naming conventions. The Snipping Tool automatically suggests filenames, but creating your system improves organization. Use formats like “Project_Date_Description” for easy searching.
Quality control measures ensure consistent results. The screenshot utility saves images at screen resolution by default. For high-DPI displays, this creates large files. Consider your intended use when choosing compression levels.
Here are professional workflow tips:
- Create dedicated screenshot folders organized by project
- Use consistent file formats (PNG for graphics, JPG for photos)
- Set up automatic backup to cloud storage
- Establish team standards for screenshot documentation
And particularly in the case of time-saving automation, keyboard shortcuts are the key. Learn the keyboard shortcut for screenshots on your particular platform so you can avoid using the mouse to navigate at all. I would recommend practicing the above steps until it becomes second nature to access the Snipping Tool.
More advanced users can script activities. With these cmdlets, Windows PowerShell can take screenshots and save them to files. Mac’s Automator for Multiple Screenshot Processing. Automator uses it to create custom workflows that handle multiple screenshots at once.
Snipping Tool for Windows 11 & Beyond: What's New
Microsoft Windows 11 Snipping Tool is a big upgrade from the previous versions. The new interface is the stitched-together version of classic Snipping Tool and Snip & Sketch. This one-handed method eliminates the confusion of many screenshot apps.
New capture abilities include scrolling screenshots for lengthy web pages. With video recording, it converts your screen clipping tool into a full-fledged screen recorder. Multi-monitor support automatically detects and captures multiple monitor setups simultaneously.
It is all about AI-driven features in the future. Microsoft will introduce automatic text recognition in screenshots so that captured content can be searchable. Smart crop will also recommend ideal crop boundaries based on the content.
Teams integration optimizes collaborative processes. Screenshots can automatically be sent to Teams channels, with a notification for the recipients. If you have multiple people editing the same captures, source control avoids confusion.
OneDrive’s automatic backup feature means you never have to worry about losing an important shot. Set up automatic synchronization to be able to view the captures on all devices. There are tools available to manage storage that can improve its use in the cloud.
Your Screenshot Mastery Journey Starts Now
Mastering the Snipping Tool changes how you work and play on your computer. These methods are effective right away – you don’t need any training period. Begin with simple, basic rectangle screenshots, then slowly introduce advanced tools such as delay timers and text annotations.
You have practice all around you, every day. Record IT problems and their solutions. Develop visual instructions for co-workers. Screen grab for social media posts. With every task, your abilities grow, and you tackle big, real-world solutions.
The right way to screenshot on Windows/Mac depends on what you want the screenshot for. Try various models and functions. Train your fingers into muscle memory with your most-reached-for screenshot keyboard shortcuts. Eventually, screen capture is as intuitive as copy and paste.
Professional development involves educating others in these skills. If they still can’t grasp the simple concept of a screen capture, then show them how it’s done. Your mastery of the Snipping Tool is a win for the office.
Remember: the best tool is the one you use. The Snipping Tool that’s built into Windows, however, is not installed by default in Windows 10 — it has to be downloaded from Microsoft. Learn these skills today and see your productivity skyrocket tomorrow.
READ MORE ABOUT: How to take screenshots on Mac
Frequently Asked Questions
Where to find the Snipping Tool on Windows 11?
Press Windows key + Shift + S for instant access, or search “Snipping Tool” in the Start menu. You can also find it in the Windows Accessories folder in your app list.
What are the differences between Snipping Tool and Snip & Sketch?
Windows 11 merged both apps into one unified Snipping Tool. The new version combines classic capture modes with modern annotation features and sharing options.
How do I use the Snipping Tool to crop images after capturing?
After taking a screenshot, click the crop button in the annotation toolbar. Drag the corners to resize your selection, then click the checkmark to apply changes.
Can I annotate screenshots with the built-in screenshot tool?
Yes, both Windows and Mac offer annotation features. Use highlighters, pens, text boxes, and shapes to mark up your screenshots before saving or sharing them.
How to capture the screen using Snipping Tool with a timer delay?
In the Windows Snipping Tool, click the timer dropdown and select 3, 5, or 10 seconds. This delay helps capture dropdown menus, tooltips, and other temporary interface elements.


